
|
Bullet Casting Introduction Shooters usually start reloading because we're motivated by saving money but quickly learn that reloading is an interesting and worthwhile hobby in its own right. Reloaders experience pride in loading their own ammunition. Similarly, many reloaders start casting their own lead bullets because they want to save money, only to find that bullet casting is an interesting and enjoyable hobby as well. Casting your own lead bullets adds another source of pride to reloading ammunition, and offers yet another level of control over the ammunition you shoot, providing more opportunities to develop custom loads optimized to your gun and your shooting needs. Cast lead bullets are surprisingly accurate, and while most people cast bullets in large volume for use in pistols, lead bullets are very accurate in rifles as well, and harder lead bullets can be shot at reasonable rifle velocities without excessive bore leading. Sources Of Bullet Lead One source of lead alloy with the antimony hardening agent already added is used lead wheel weights. These are the small curved weights placed on the rims of car wheels to dynamically balance the wheel. When new tires are installed, the old wheel weights are removed and discarded. Wheel weight alloy is perfectly suited for casting pistol bullets, and when quench cooled it may be hard enough for magnum pistols, and oven heat treated wheel weight bullets will often be hard enough for slower rifle bullets. If harder bullets are needed, additional antimony can be added in the form of Linotype alloy, or chilled lead shot. Most tire shops are happy to give away their scrap wheel weights. Otherwise, they must dispose of it as lead waste. Most municipal garbage services will not accept heavy metals because they represent a potential toxin that can leach into ground water. Now that shooters have learned they can get free bullet casting lead, the supply of lead wheel weight scrap is already spoken for in many areas. You can buy wheel weight lead that someone else has recovered. On eBay, lead ingots usually sell for about a dollar a pound including shipping, usually in 35 to 50 pound lots. In smaller quantities, it sells for about a dollar a pound before shipping. The 50 pound lots are actually a decent deal, because there is a fair amount of dirty labor involved in separating the soft lead stick-on wheel weights from the harder clip-on weights, melting the lead, fluxing, skimming the impurities off the top, removing the steel clips that were used to attach the wheel weights to the wheel, etc. Rendering wheel weights into casting lead generates a lot of smoke and is a messy process. If you decide to melt wheel weights yourself, don't do it in the bottom pouring melt pot you use to cast the lead bullets. The debris from the dirty wheel weights will clog the spout. Your casting pot is also not large enough to accommodate a large volume of wheel weights. For the sake of convenience, and to keep the ingots all the same alloy for uniform bullets, you should melt all the wheel weights in a single batch. A large electric skillet with a thermostat or a turkey broiler pan are good options. Lead is extremely heavy, and molten lead can slosh or cause a skillet to twist quickly out of your hands. At the very least, this will make a huge mess. It can also be very dangerous. Be careful when handling large amounts of molten lead. You can also purchase casting alloy from shooting supply companies, but the cost is about the same as buying lead bullets already cast and lubricated. Equipment And Materials
Step-By-Step Guide (a 12-step program for your shooting addiction) 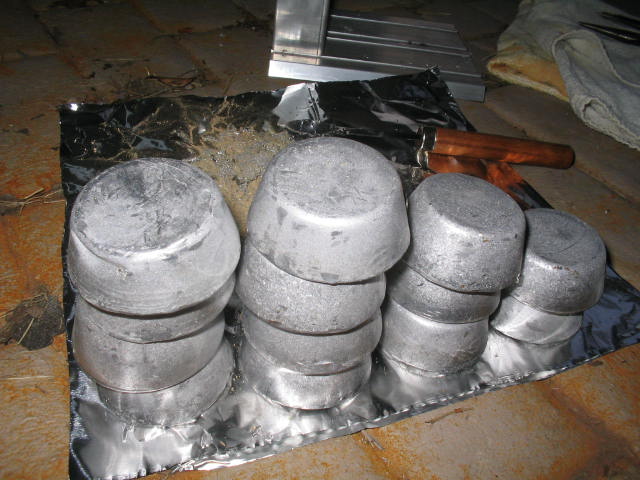 1. Assemble the lead Lead ingots come in a few different sizes, depending on the molds used to cast them. Shown here are ingots cast into regular sized muffin tins. These are the least convenient because they don't fit regular sized melt pots and will only fit well in a larger furnace such with a capacity of 20 pounds. Mini muffin ingots fit into the smaller melt pots, but don't stack well. One pound rectangular ingots are cast into ingot molds made specifically for bullet casting lead, as supplied by companies such as Lee or Lyman. these will stack upright on their ends in the melt pot, allowing the pot to be filled with ingots which will melt and nearly fill the lead pot without waiting for some ingots to melt to make room for the second batch of round ingots. 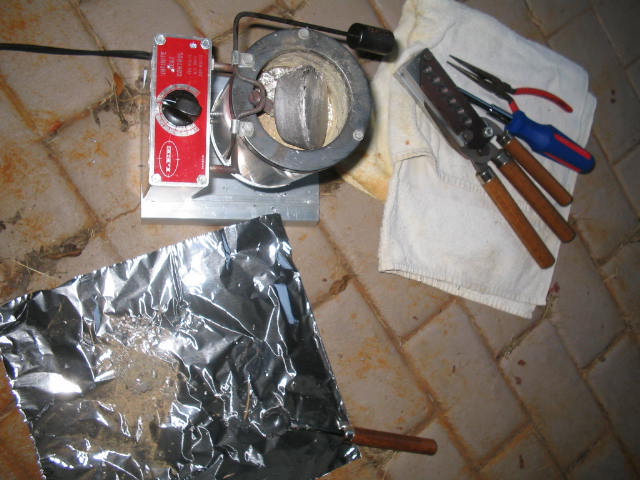 2. Melt the lead Smaller melt pots such as the 10 pound capacity Lee Production Pot 4 have a 500 watt heater and will require 10-30 minutes to melt a pot of lead, depending on how well the ingots fit the melt pot and the ambient temperature and wind that will be cooling the melt pot. Leaving the melt pot unattended is a bad idea because the valve may stick open slightly and the lead can melt and run out the bottom of the melt pot and all over your work area. It also represents a potential fire hazard, as the melt pot will operate at around 700°F, which is well above the ignition temperature of common items such as paper, wood and fabric. For maximal convenience, the best solution may be two smaller melt pots so one pot can be melting lead while casting from the other pot, or one larger capacity furnace that can accommodate the addition of an ingot without cooling the molten lead too much or interfering with the bottom pour valve. Shown in the foreground is the steel ladle and the dross skimmed from the molten surface and deposited onto aluminum foil for easy disposal. Shown in the back is the old towel used to catch bullets, a six cavity aluminum mold, a regular screwdriver used to turn the valve stem to clear debris, and the needle nose pliers used to pick up small hot objects, usually for transfer to the melt pot. 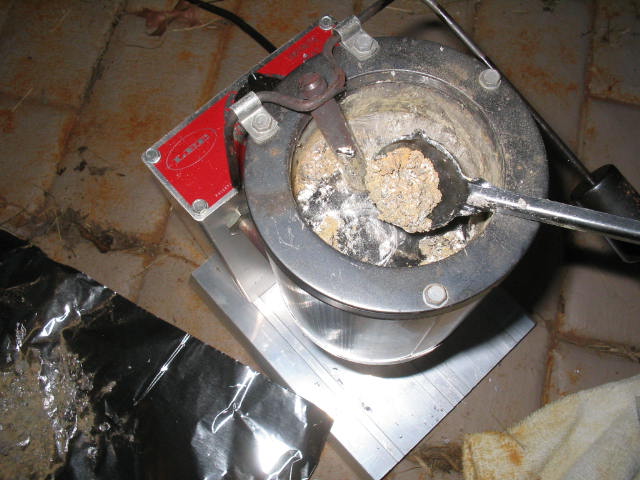 3. Skim the dross Add a pea sized piece of flux, or a similar amount of powdered flux and stir it into the molten lead using the ladle. Fluxing generates a lot of smoke, which is one reason that bullet casting should always be done outside. Be careful not to inhale any of the smoke, and try to avoid letting the smoke contact your clothing to minimize exposure to lead. Use the ladle to scoop the fine, fluffy grayish brown powder from the surface of the molten lead and gently transfer it to the aluminum foil to prevent the dross from becoming an airborne cloud that can be inhaled, or settling on adjacent surfaces to contaminate them. Midway sells ClearCast, a good flux specifically intended for lead casting. A pound is about $8.00 on sale and may be a lifetime supply. 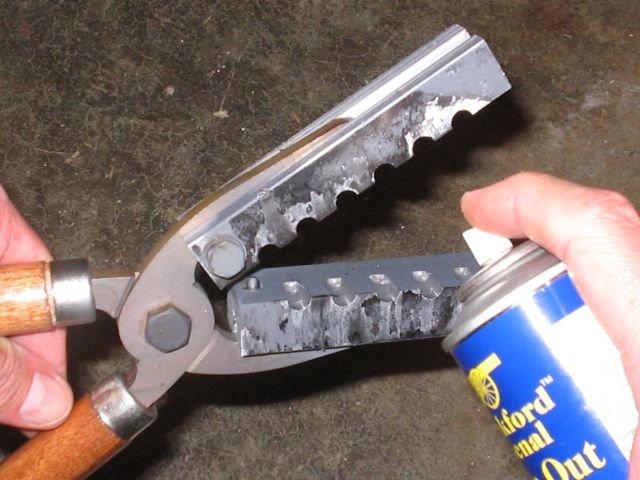 4. Apply mold release The mold should be thoroughly cleaned using a fully evaporating solvent such as isopropyl alcohol or white gas to remove all oils remaining from the machining process. This only needs to be done once on new molds, or after any time a steel mold is sprayed with an oil or wax to prevent it from rusting, which is a good reason to use aluminum molds. Next, deposit a thin layer of carbon inside the mold to act as a mold release. The old method of blackening a mold used a burning kitchen match. A much faster method uses a spray that is essentially fine carbon in a solvent. The process resembles spraying black or dark gray spray paint. The solvent quickly evaporates, leaving a uniform coating of carbon.  5. Cast the bullets Preheat aluminum molds by dipping the end into the molten lead. Be sure the mold is tightly closed to keep lead from sticking to the inner mating faces of the mold, where it could hold the mold open and produce larger, out-of-round bullets. If the lead solidifies around the mold, the lead is not hot enough or the mold is not hot enough. After about 30 seconds the mold will probably be hot enough to start casting bullets. Make certain the mold is completely closed by holding the handles firmly together. Make certain the sprue plate is completely closed. Hold the mold opening under the spout with one hand and lift the valve handle with the other hand to start the flow of lead. The valve opens more as the handle is lifted higher, so you can control the flow rate. Some molds fill faster than others. With a multi-cavity mold, when the lead starts to pool above the sprue plate, move the mold to expose the next cavity to the stream of molten lead. When all mold cavities are full, lower the valve handle to stop the flow of lead.  6. Cut the sprue Watch the lead above the last poured mold cavity. Within a couple of seconds you should see it solidify as it turns from shiny to dull and the surface sinks slightly. Pull the sprue plate handle to the side. The base of the handle has a cam that pivots on the side of the mold body to produce a mechanical advantage to shear the sprue at the base of the bullets. If casting shotgun slugs, the sprue is cut on top of the slug because the base is hollow. If the sprue plate was not completely closed when the lead was poured, the cam cannot generate any leverage to cut the sprue. In this case, wedge the screwdriver blade between the cam and the mold body to fill the space, and then activate the sprue plate handle to cut the sprue. You may be able to gently return the cut sprue directly into the top of the melt pot, but only do so if you can reliably do this without causing any molten lead to slosh out of the pot.  7A. Empty the mold Open the mold handles and allow the bullets to gently drop out. Do not allow the bullets to fall more than a couple of inches or land on a hard surface. They're still a bit soft and can deform on a hard impact. The sprue and six perfect bullets are shown. If a mold cavity won't readily release a bullet despite the cavity being properly blackened with carbon mold release, there may be a slightly sharp edge on that mold cavity. Very gently scrape the edge of the mold to remove the burr. The bullets are shown here after being dropped onto a thick folded towel.  7B. Quench cool the bullets (optional) Instead of dropping the bullets onto a folded towel to air cool, the other option is to drop the bullets directly into a water bath to quench cool them, resulting in harder bullets. Be careful not to splash water onto the hot mold, and be very careful not to splash water into the melt pot. It will instantly explode as it vaporizes into steam, slinging molten lead in all directions and possibly causing a nasty burn. If bullets are dropped directly into water, the water bath should be two or three steps away from the melt pot. The above picture shows a large colander originally intended to separate tumble cleaning crushed walnut cleaning media from brass. Instead, the colander is lined on the bottom with a towel to provide a soft landing for semi-molten bullets as they're dropped into the water bath. Bullets can also be dropped into a five gallon bucket that is completely full of water and even though they sink quickly, they'll solidify before reaching the bottom of the bucket. 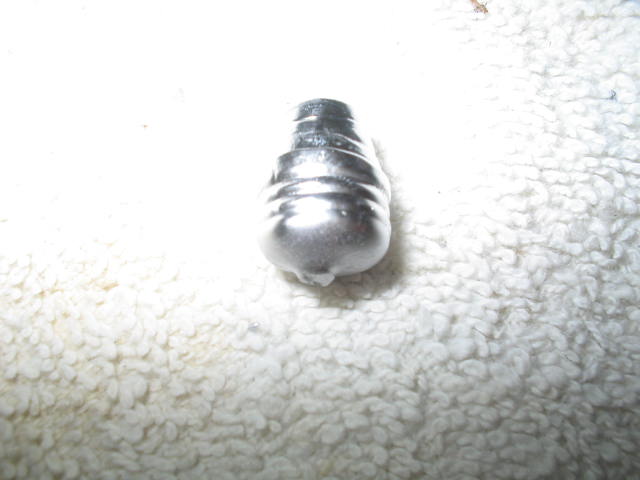 8. Bad bullet If you properly pre-heated the mold and the lead was warm enough to cast and the alloy contained enough tin to improve its casting properties and no zinc to ruin its casting properties, you should have perfectly formed cast lead bullets. Every now and then, something will go wrong and the mold won't completely fill, producing an ugly bullet like the one shown above. it's a good idea to cast onto a folded towel to make sure everything looks good before dropping bullets into the water bath, where malformed bullets would be difficult to retrieve. 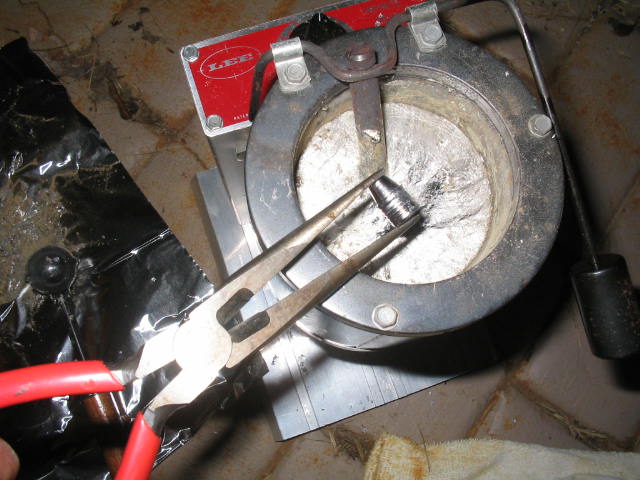 9. Recycle bad bullets in the melt pot Bad bullets can be easily recycled by returning them to the melt pot. Be careful not to drop the bullets from more than an inch above the surface or the molten lead may splash up onto you. Do not return any bullets to the melt pot if they have even a little bit of moisture on them from the quench cooling water bath. Very little water is needed to cause a lot of steam with splashing and popping lead. Save wet bullets to recycle the next time you cast bullets. 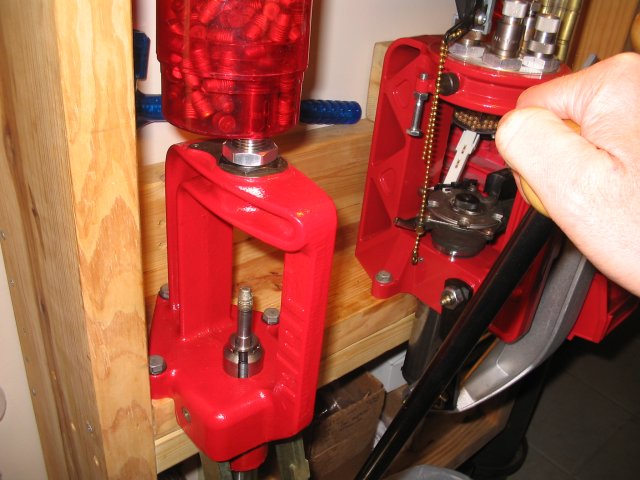 10. Resize the bullets (optional) Cast bullets can be resized using a resizing die. A good mold will produce properly sized bullets, so the resizing step is optional, but there are a couple of reasons a bullet could be out-of-round or the wrong size. The bullet could have been dropped while still hot and not quite solid, and it could have deformed on impact, either hitting on the side and becoming out of round, or hitting on the top or bottom and becoming shorter and larger in diameter. The inner face of the mold could have had a small spec of debris which could have held the two mold halves sprung apart slightly, resulting in a larger, out-of-round bullet. Bullet sizing is a bit time consuming but serves as an excellent quality control check. The process is simple. Place the bullet on the ram, lower the handle to raise the ram. the ram pushes the bullet up through the bullet sizing die and into the reservoir on the top. Other bullet sizers work in a similar manner, and many fill the lube groove between the drive bands with stick bullet lube as the bullet is resized. 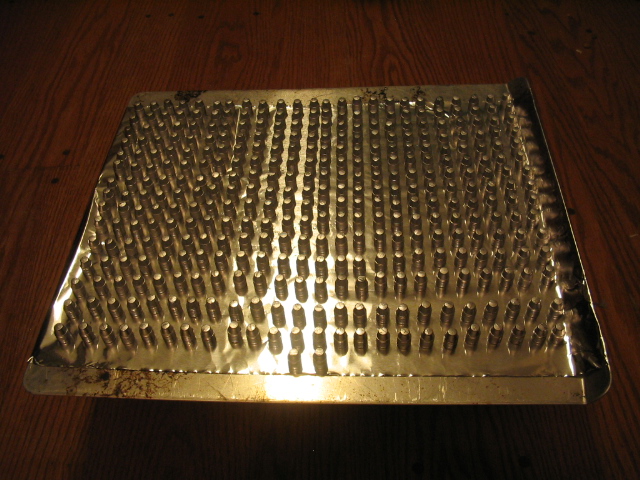 11. Heat treat the bullets (optional) The bullets can be heat treated for an hour in the oven and then immediately plunged into water to quench cool them. This will produce harder bullets than quench cooling directly from the mold. A flat bottomed metal colander that can be plunged into the quench bath is a safer and more convenient method than the flat sheet of bullets shown above. Avoid using any oven for heat treating lead that will be later be used for food. No aspect of bullet casting should be performed in a kitchen. All bullet sizing operations should be concluded before heat treating because subsequent sizing would work soften the bullet and negate most of the hardening accomplished by heat treating. For details about oven heat treating, including a chart showing oven temperatures and the resulting hardness, please visit the Bullet Hardness page. 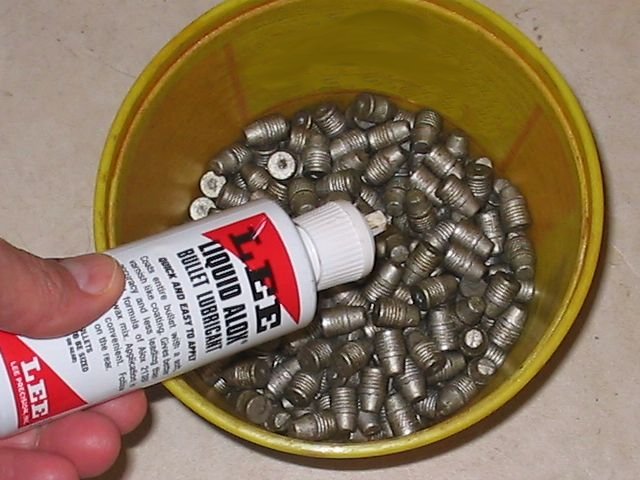 12. Apply bullet lube Lead bullets require lubrication to prevent them from depositing lead in the bore when shooting. There are many types of bullet lube. Traditionally, a stick of hard wax bullet lube is used in a lubrisizer to lubricate the bullets as they are sized. It's a bit messy, but the lube works well. For less mess and lower cost, tumble lube bullets using a thick liquid bullet lube. This works best if the bullets have tumble lube grooves or micro bands. Instead of two thick drive bands on the shank and a thick lube groove in between, bullet molds designed for tumble lubing have a few smaller drive bands with a few smaller lube grooves between them, providing more surface area for the thick liquid bullet lube. The tumble lube process is simple. Dump the sized bullets into a plastic container and add a blob of liquid bullet lube. About a teaspoon is sufficient to lubricate 200 bullets in the 9mm to 10mm range. Put the lid on the plastic container and shake, rock & roll until the bullets have a uniform coating. This only takes a minute. Pour the bullets out on an old cookie sheet in a layer one bullet deep to dry overnight. With tumble lube, the sticky lube is applied to the entire bullet and not just the lube grooves on the shank where it's needed. This makes handling the bullets a bit messy when reloading ammo, and loading ammo at the range. Sprinkling a teaspoon of powdered mica over the bullets will help keep the bullet lube on the bullets. Stick lube requires a Lubrisizer to apply the lube to the bullets when they are being sized, or the lube can be melted, poured into a shallow pan with the bullets resting on their bases. When the lube has hardened, the bullets can be cut out of the pan of lube using a short length of properly sized thin wall brass tubing which is usually available at hobby shops. Polygonal Rifling Warning Some pistols from companies such as Glock, Heckler & Koch, Kahr and Magnum Research use polygonal rifled barrels. Glock specifically advises against the use of lead bullets in their guns. There does seem to be some anecdotal evidence that lead bullets can cause more lead fouling and potential overpressure problems in Glocks. Other anecdotal evidence suggests there may be a problem with lead deposits at the forward end of the chamber preventing a cartridge from fully chambering fully and possibly firing out of battery with damage to the pistol and possibly the shooter. Many shooters note that Glock also advises against all reloaded ammunition, and have shot thousands of lead bullets in Glocks with no problem. Regardless of the rifling, it's important to prevent leading in the barrel. The best way to avoid a leading problem is by selecting a lead hardness that is appropriate to the muzzle velocity and properly lubricate the bullets. If switching to a new lead alloy or changing any aspect of the casting process that might effect hardness, it would be prudent to visually check the bore for any signs of leading after 50, 100 and 200 rounds, and clean the bore if needed. Mildly abrasive bore cleaners will remove any leading in much less time. Lead Safety Do not cast any lead without first reading and understanding the procedures for safely working with lead. Lead safety concerns not only you, but anyone else who may come in contact with your work area. Lead poisoning is very serious, but also easily avoided with the proper understanding and a little care. http://www.tacticoolproducts.com/leadsafety References: Lee Production Pot 4 Instructions: http://www.leeprecision.com/cgi-data/instruct/EM1142.pdf Steel Dipper: http://www.midwayusa.com/eproductpage.exe/showproduct?saleitemid=161177 ClearCast Lead Fluxing Compound: http://www.midwayusa.com/eproductpage.exe/showproduct?saleitemid=593033 Drop Out Bullet Mold Release Agent: http://www.midwayusa.com/eproductpage.exe/showproduct?saleitemid=763758 Lee Six Cavity Bullet Mold Instructions: http://www.leeprecision.com/cgi-data/instruct/SC1334.pdf Lee Bullet Sizer Instructions: http://www.leeprecision.com/cgi-data/instruct/BS2003.pdf Lee Liquid Alox Bullet Lubricant: http://www.midwayusa.com/eproductpage.exe/showproduct?saleitemid=466811 Polygonal Rifling Information: http://en.wikipedia.org/wiki/Polygonal_rifling  |
Copyright
2007
Tacticool Products
All
Rights
Reserved
|