
|
Measuring Bullet Hardness 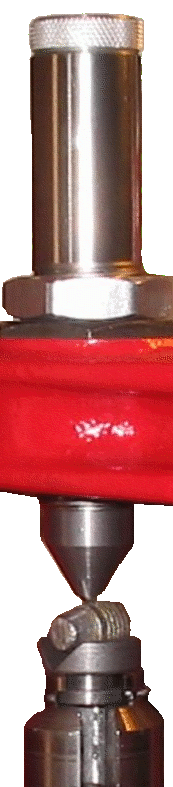 Introduction IntroductionFor pistol plinking ammo there is little need to control bullet hardness to a fine degree. The biggest issue is avoiding bore leading, and there is a wide range of acceptable lead hardness that satisfies that goal. When optimal accuracy is the goal, there is some advantage in controlling the lead hardness with more precision as described in the earlier bullet hardness article, and that requires some tools to measure lead hardness. Measurement Tools The Brinell hardness test measures lead hardness by pressing a hard ball into the surface to be tested with a constant force and then measuring the small crater that is produced. Measuring the hardness of small objects like bullets, and using the relatively low force that can be applied with a reloading press will require a small ball indenter producing a small dent that can only be measured using magnification. The Lee Lead Hardness Testing Kit is a reasonably priced tool to measure lead bullet hardness. It costs about $45, and about $40 on sale. It's easy to use. The indenter assembly threads into a single stage reloading press. The indenter is a 5/32" ball bearing. The indenter assembly is spring loaded. As pressure is applied by raising the press ram, the bullet is pushed upward against the indenter and the spring compresses. This raises a pin flush with the top of the indenter assembly, which indicates 60 pounds of force is applied to the bullet by the ball indenter. Hold the press in this condition for thirty seconds and then lower the ram. At this point, the bullet has a small dimple from the indenter. The wider the dimple, the softer the bullet. The following image shows four bullets from a single batch that were tested at one time. The image was reduced in size from the 2400 DPI original scan. Lee recommends using a file to make a flat spot on the side of the bullet. In the following image, only the bottom left bullet was filed. All four measurements were very similar. The bullet nose was tested because it was already flat. Do not test the opposite end of the bullet where the sprue plate cuts off the sprue because this will cause incorrect lead hardness readings. Avoid testing an area that includes the mold parting line, as shown top left and bottom right in the following image. 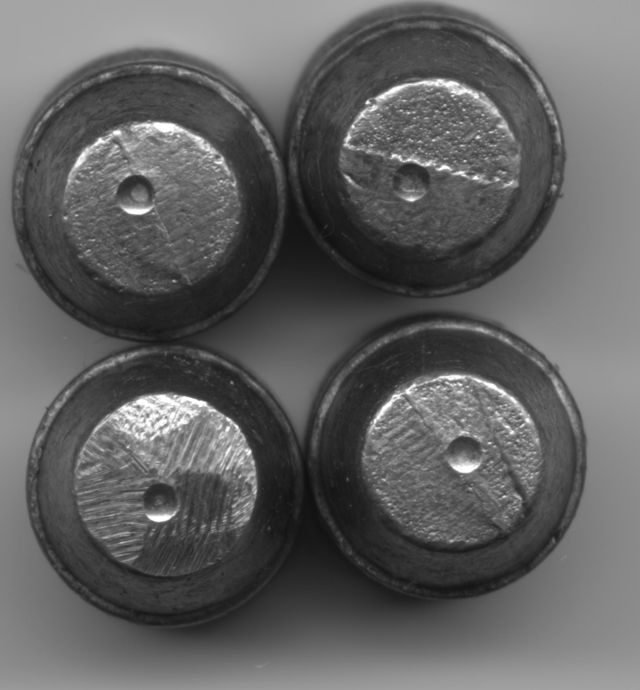 The Lee Lead Hardness Testing Kit is provided with a small fixed power pocket microscope with a reticle that's used to measure the diameter of the dimple. This requires a lot of light, so it might be a good idea to use a pocket LED flashlight or maybe a bore inspection light shining on the dimple. The small microscope inverts the image, so the microscope must be moved in the opposite direction than it appears. Counting the small .002" reticle lines can be challenging, but it's a good simple solution. However, a scanner capable of 2400 DPI can do a lot of the magnification, and this allows the image to be seen on a PC. This is a major benefit, especially to anyone beyond middle age who probably doesn't see as well as they once did. Load the image into an image editor that will allow linear measurements to be made. GIMP is a free and powerful image editor, and was used to create the following image. 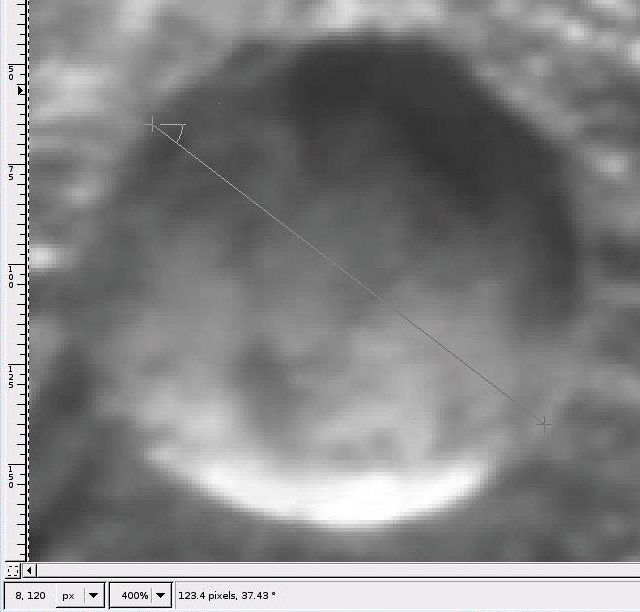 The above image is a screen capture showing a greatly magnified view of the 2400 DPI dimple on a bullet intended for use in a magnum pistol. At 2400 dots per inch, each pixel is 1/2400th of an inch, or .0004167". Select the measurement tool from the tool bar. Click on one side of the dimple, then click again on the opposite side of the dimple. The measurement line will be shown as depicted above, and the bottom line of the screen will indicate the number of pixels represented by the measurement line. In this case, the measurement is 123.4 pixels. Note that at this extreme zoom level, sub-pixel resolution is possible, which is much better than the measurement resolution when using the pocket microscope. Take four measurements, horizontal, vertical, and two opposing diagonals, and average the four values. 123.4 pixels Then, refer to the chart supplied with the Lee Lead Hardness Testing Kit to determine the Brinell hardness number (BHN). The chart is reproduced below, along with a column to index BHN to pixels, to avoid the need to make the simple calculation shown above. 2400 DPI is more resolution than is needed. 1200 DPI would work, and with the image software's ability to make sub-pixel measurements combined with averaging four values, even a 600 DPI scanner would be sufficient.  Note that there is no row in the table for .0514", or 123.4 pixels. Some interpolation is required. There's no need to be extremely accurate in the interpolation. If a diameter is about halfway between two rows, pick a BHN value halfway between those rows as well. If it's a third of the way to the next row or less, round down. If it's two thirds or more, round up. 123.4 pixels is close enough to halfway between 122.4 and 124.8 to call it halfway, just as .0514" is about half way between .051" and .052". Half way between 20.1 and 19.3 yields a BHN of 19.7, which is a relatively hard pistol bullet but is probably just about right for the higher chamber pressure of a magnum pistol. For Additional Information: http://en.wikipedia.org/wiki/Brinell_hardness_test http://www.realguns.com/archives/118.htm << Part 2: Bullet Hardness <<  |
Copyright
2007
Tacticool Products
All
Rights
Reserved
|