
|
Vertical Reloading Bench 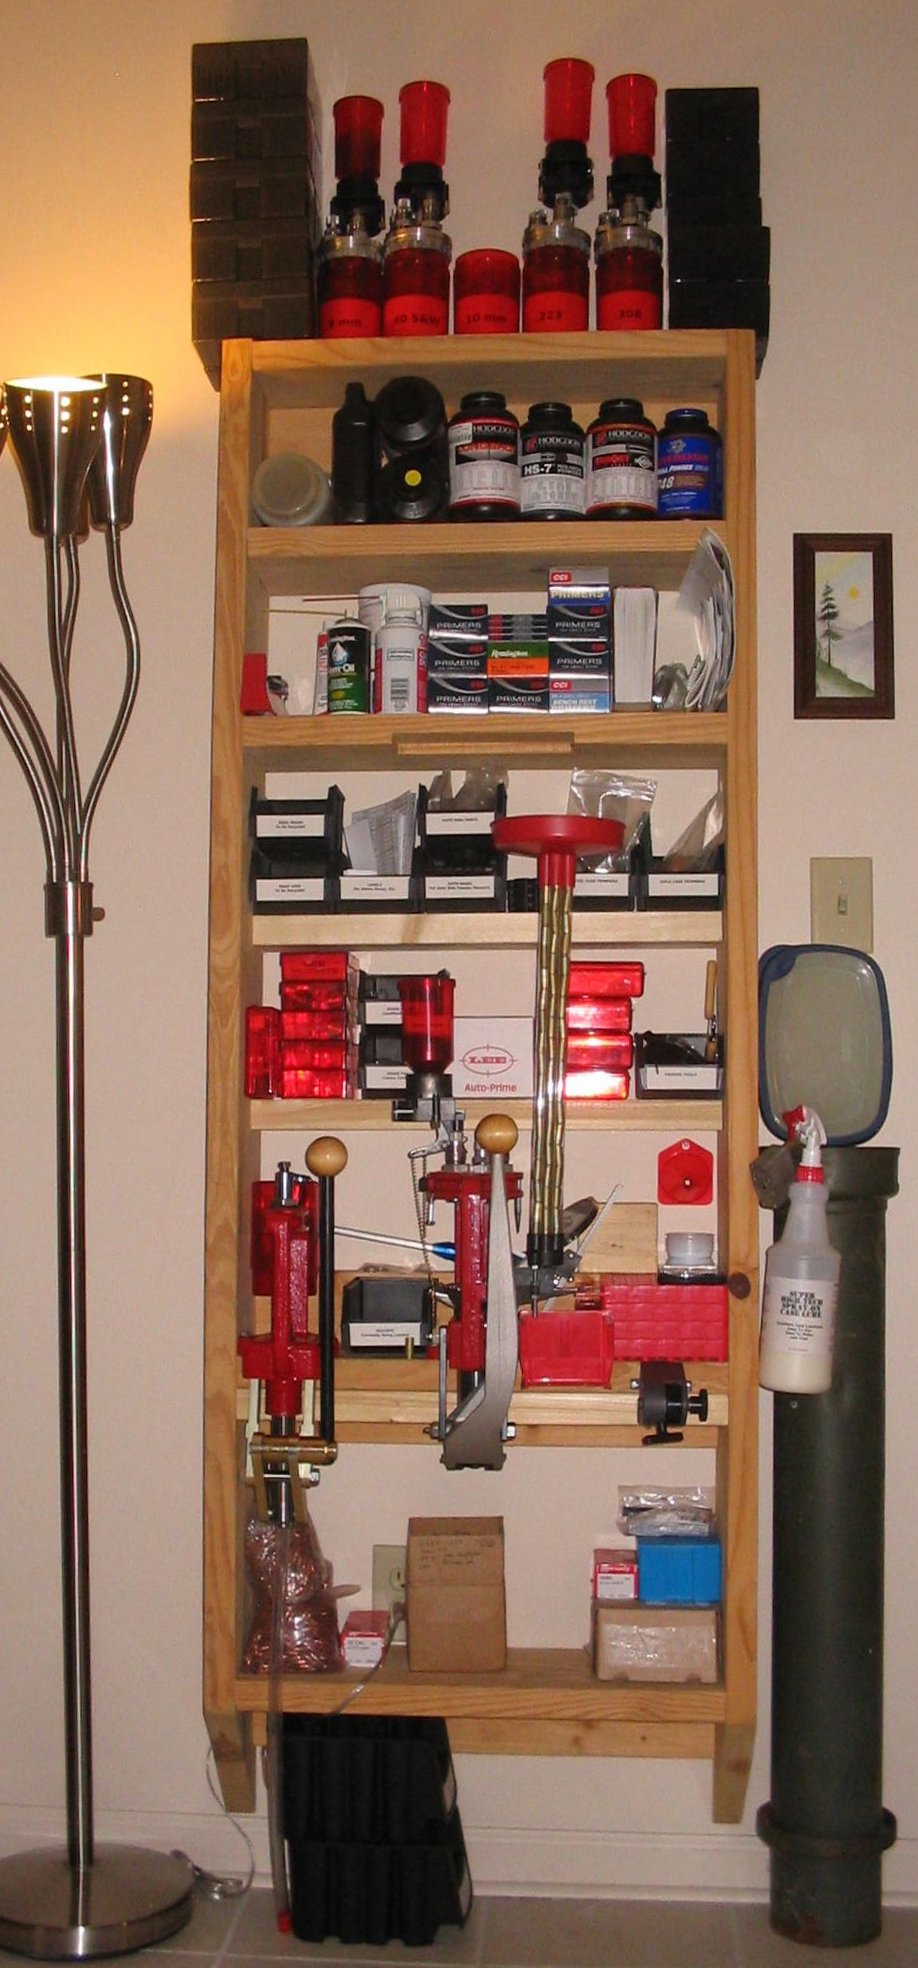 Click the image to
zoom to see
greater detail
The vertical reloading bench is inexpensive and easy to build. It offers an enormous amount of very conveniently arranged storage in a small footprint. It can even be mounted to the back wall in a small walk in closet. The vertical reloading bench can be scaled easily by changing the width and the depth to suit a wide variety of uses. Click HERE for a description of all the equipment and supplies shown in the picture. Tools: Circular saw, jig saw, or hand saw Drill Random orbital sander or #100 sandpaper Square drive or Phillips drive bit Tape measure Torpedo level (optional) Electronic stud finder (optional) Materials: Wood (see below for specifics) Polyurethane finish, paint, etc. (optional) Decking screws, 3" Bolts, washers & nuts or lag bolts to mount the press The vertical reloading bench shown above is 7" deep (2" X 8" lumber), 26" wide and 72" tall (12' long 2" X 8" cut at a 45 degree angle in the center to make the sides). There is nothing critical about any of these dimensions. Feel free to design your own customized version to match the space you have and the stuff you want to store on it. Make it a little wider than you think you'll need if you have room because, "Stuff always expands to fill the available space... and a little bit more." You may decide you want a large progressive press AND a large single stage press, as shown above. You may decide you'd like to try reloading shotgun shells, which requires another reloading press. Or, you may go caliber crazy and have a dozen turrets loaded with different caliber dies. You may decide the political climate will result in major price increases in reloading supplies and want to buy in bulk. Design Considerations: The concept is simple. Cut the two sides to be as tall as you want the vertical reloading bench to be. Taller is better. If the top shelf is difficult to reach, you can use it to store infrequently used items. It's better to have the storage option and not use it, than not to have the option at all. Next, cut all the shelves and the back plates used to mount the vertical reloading bench to the wall the same length. This dimension is the width of the shelves. It's also the width of the reloading bench minus three inches, which is the thickness of both sides. Sand the pieces of wood to make them smooth. Assemble the vertical bench by screwing through the sides and into the ends of the shelves and back plates. Apply a finish if desired, and allow it to dry overnight. Mount the vertical reloading bench to the wall. There are a few potential "gotchas", so read the details below to avoid a few common problems. All joints are simple butt joints. Pre-drill both sides with clearance holes for the decking screws and screw into the horizontal pieces that form the shelves and back plates. Pine is soft enough that there is no need to drill pilot holes into the ends of the shelves or back plates. The back plates are used to attach the vertical reloading press to the wall studs. There is a back plate under the bottom shelf, above and below the shelf where the presses are attached, and under the top shelf. Position the finished vertical reloading bench against the wall, determine where the studs are, and drill clearance holes for the long decking screws in the back plates to align with the wall studs. At least two wall studs must be used to mount the vertical reloading bench. Buy the reloading press first, and use it as a guide when designing the bench. Make certain there is adequate clearance on the shelves above the press for all parts of the press to clear as the press is operated. This will vary with each type of press. For example, the large red case collator shown in the above picture on top of the four tubes full of cases rises as the press operates. The two shelves directly above the press are not as deep, and are made from 2" X 4" lumber. Use a 6" double thick shelf where the press will be mounted because this shelf will sustain a lot of torsional forces when resizing rifle brass. Use 3-4 screws in each end of these two shelf boards. Capturing the back of this shelf between two back plates will also help keep it from twisting when the press is operated. Before assembling the vertical reloading bench, pre-drill the press mounting holes in both boards that will be used for the double thick shelf. Drill a hole under the press for spent primers if your press is designed to eject spent primers down through the base. Bolts extending through the press base and both shelves with washers and nuts on the bottom will provide the strongest mounting. Countersinking the bolt threads and nuts on the bottom of the press shelf will make the shelf below the press more convenient to use, without risk of protruding hardware. You can also mount the press using the largest diameter lag screws that will fit the press base. If you use lag screws instead of bolts, select the longest lag screws that don't extend past the bottom of the lower board in the double thick shelf and drill pilot holes instead of clearance holes. Secure full depth shelves using three decking screws in each end. The shallow shelves above the press and the back plates are made from 2" X 4" lumber and should be secured with two decking screws into each end. A scrap of lumber can be used to make a simple drill guide that will ensure even spacing for each shelf. You'll save measurement time and the results will look better with rows of evenly spaced shelf screws. The height of the top of the reloading press shelf is very important to ensure the reloading process is ergonomic. You will be pulling the handle on the reloading press thousands of times, maybe hundreds of thousands of times, so it should be as comfortable and natural as possible. Experimentation before mounting the press to the wall will help determine the proper height. The height will be determined by the design of the press, the height of your chair, your height and the length of your arms, etc. Somewhere around 28" will probably be the optimal height for the top of the press shelf, but you should determine the most ergonomic height for yourself. The best time to determine the proper height of the press is when you are designing the vertical reloading bench and determining where to place the shelves. That will keep you from building the bench and then realizing that the floor or ceiling prevent you from lowering or raising the bench enough to make reloading comfortable. You should also consider the height of the objects you plan to store on the shelves so the shelves can be spaced for optimal storage efficiency. For example, one pound powder bottles are 6.5" tall for Hodgdon and later Winchester products, but Alliant bottles are 9" tall. Allowing 12" of space for the powder shelf would waste 3" to 5" of vertical space. A 9" spacing would waste 2" for Hodgdon powder but would be slightly too short for Alliant bottles. Bullets are heavy. The vertical reloading press is very strong, and any shelf would be able to support the weight if loaded with bullets, but you should also consider safety. Having a 20 pound box of bullets fall onto your head from the top shelf could cause a serious injury. It's also difficult to store heavy objects on a high shelf. Bullets are probably best stored on the bottom shelf. Bare sanded wood is a perfectly acceptable finish, but polyurethane floor varnish will provide extreme protection from stains. You could also use a semi-gloss or gloss interior or exterior paint or solid stain if you'd rather not see the wood grain. Do not apply any finish to the back side of the press to avoid having the press glued to the wall. If any finish is accidentally applied to the back, it can be removed using a random orbital sander or belt sander. You may also decide to leave the bare sanded wood finish everyplace except the top of the press shelf, which will receive the most wear and tear. The top of the press shelf can be laminated with Formica counter top, a piece of hard plastic, or even a sheet of stainless steel. Or, you could apply polyurethane or paint to the top of the press shelf prior to assembly for a low cost and easy finish that is low maintenance and will look good even after years of use. Mount the vertical reloading bench to the wall using eight long decking screws. Use one decking screw per wall stud, per back plate. This will provide a very secure mounting that is far more stable than the heaviest and most expensive conventional horizontal bench resting on the floor under its own weight. The vertical reloading bench becomes a part of the building. Do not use drywall screws to build the vertical reloading bench or to secure it to the wall. Drywall screws are brittle and they will break. Decking screws are larger diameter and the steel is not brittle, so the tensile strength is much greater.  |
Copyright
2007
Tacticool Products
All
Rights
Reserved
|